Building for the Atmel "SAMD20 Xplained Pro" in Ubuntu 14.04
18 Sep 2014This is a brief outline of the steps taken to get sample code from the Atmel ASF for the “SAMD20 Xplained Pro” built and flashed to the board from Ubuntu 14.04. Much of this guide is built around insights from AndreyYurovsky and V. Kornilov Matwey.
Prerequisite Hardware
Software Installation
-
Eclipse CDT this is an Eclipse IDE tailored to C/C++ development. This guide was written for Eclipse Kepler, install this first.
-
GNU Tools for Embedded Processors this is a toolchain that has worked on Cortex M0/M0+ processors. This guide is tested using version 2014-q2.
-
Atmel makes the “Atmel Software Framework”, available which provides plenty of actual code to begin working on the SAMD20 board. Download this file; its large (200MB). This guide was written for version 3.19.0 (“xdk-asf-3.19.0”).
-
OpenOCD 0.9.0 is used to actually connect to the board. To install this, follow the instructions at https://plus.google.com/+AndreyYurovsky/posts/5JTehC7ngTq, transcribed here for convenience:
Execute the following:
sudo apt-get install libudev-dev
git clone git://github.com/signal11/hidapi.git
cd hidapi
./bootstrap
./configure
make
sudo make install
Now, make sure that your sources.list file contains ‘deb-src’ entries. If it doesn’t, copy the existing ‘deb’ entries for Ubuntu repositories, and create an identical line for each of them, with ‘deb’ replaced by ‘deb-src’. For example, here is my sources.list file:
deb http://mirror.math.ucdavis.edu/ubuntu/ trusty main universe restricted multiverse
deb-src http://mirror.math.ucdavis.edu/ubuntu/ trusty main universe restricted multiverse
deb http://mirror.math.ucdavis.edu/ubuntu/ trusty-updates main universe restricted multiverse
deb-src http://mirror.math.ucdavis.edu/ubuntu/ trusty-updates main universe restricted multiverse
deb http://security.ubuntu.com/ubuntu/ trusty-security main universe restricted multiverse
deb-src http://security.ubuntu.com/ubuntu/ trusty-security main universe restricted multiverse
Now, obtain the OpenOCD source code, and build it:
git clone git://git.code.sf.net/p/openocd/code openocd
cd openocd
sudo apt-get build-dep openocd
./bootstrap
./configure
The output at this point (after ./configure) should look like the following image. Specifically, note that CMSIS-DAP support is present:

Then run:
make
sudo make install
At this point, you can try to launch OpenOCD to ensure that the install completed succesfully. If an error along the lines of “error while loading shared libraries: libhidapi-hidraw.so.0” occurs, just run the following and retry:
sudo apt-get install libhidapi-hidraw0
Now, copy the udev rules for OpenOCD to the appropriate location, so that the SAMD20 Xplained Pro board is properly identified when plugged into USB:
sudo cp contrib/99-openocd.rules /etc/udev/rules.d/99-openocd.rules
sudo udevadm control --reload-rules
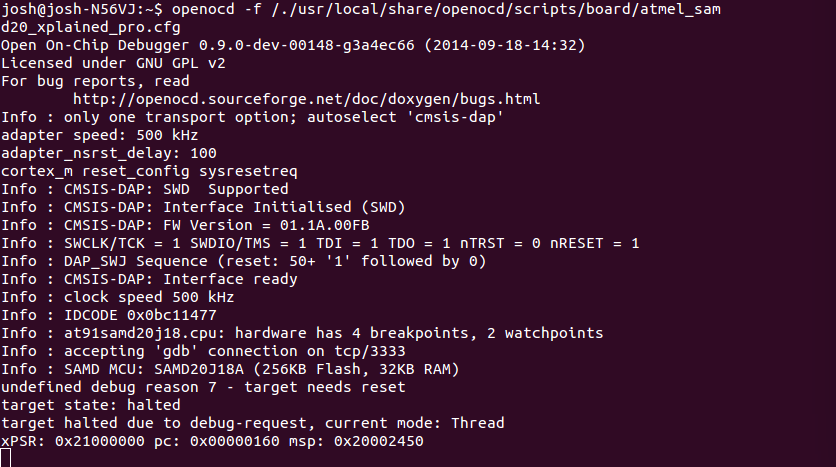
Now, if you plug in “SAMD20 Xplained Pro” via USB, and run the following command:
openocd -f /./usr/local/share/openocd/scripts/board/atmel_samd20_xplained_pro.cfg
The following (or similar) output should result:
Open On-Chip Debugger 0.9.0-dev-00148-g3a4ec66 (2014-09-18-14:32)
Licensed under GNU GPL v2
For bug reports, read
    http://openocd.sourceforge.net/doc/doxygen/bugs.html
Info : only one transport option; autoselect 'cmsis-dap'
adapter speed: 500 kHz
adapter_nsrst_delay: 100
cortex_m reset_config sysresetreq
Info : CMSIS-DAP: SWD  Supported
Info : CMSIS-DAP: Interface Initialised (SWD)
Info : CMSIS-DAP: FW Version = 01.1A.00FB
Info : SWCLK/TCK = 1 SWDIO/TMS = 1 TDI = 1 TDO = 1 nTRST = 0 nRESET = 1
Info : DAP_SWJ Sequence (reset: 50+ '1' followed by 0)
Info : CMSIS-DAP: Interface ready
Info : clock speed 500 kHz
Info : IDCODE 0x0bc11477
Info : at91samd20j18.cpu: hardware has 4 breakpoints, 2 watchpoints
This indicates that OpenOCD is successfully connected to the board; more specifically, to the debugger chip located on the backside of the board (note the microcontroller closer to the USB port). The “Interface Initialised (SWD)” indicates that the debugger is connected to the MCU.
- Note: it may be possible to use this onboard debugger to connect to other SAMD20 MCUs external to the development board by connecting to the external header pins for SWD.
At this point, if you receive an error indicating “unable to open CMSIS-DAP device”, try a different USB port (or try unplugging other USB devices).Also, confirm that ‘Atmel Corp.’ appears in lsusb when the board is plugged in.
Importing ASF Example into Eclipse
- Launch Eclipse CDT, and navigate to “File->Import”. Select “Existing Projects into Workspace” from “General”.
- From here, navigate to the directory where you downloaded/unzipped the ASF; for me, its called “xdk-asf-3.19.0”
-
Navigate to the LED Toggle example project for SAMD20 Xplained, which is found at: xdf-asf-3.19.0/sam0/applications/led_toggle/samd20_xplained_pro/gcc
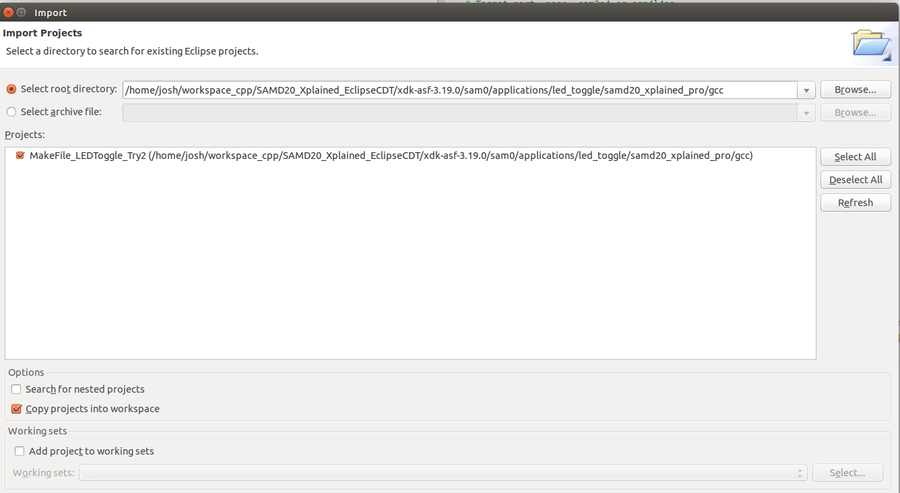
- Click “Copy Projects into Workspace”, and click Finish.
At this point, the project should be in your workspace, and a directory structure something like the following image, without the binaries is likely what shows up in the project tree:
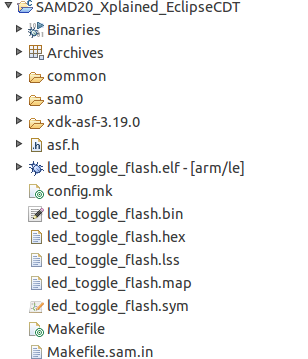
Note that “config.mk” and “Makefile” are both here, these are important.
If you try to build this, you will likely encounter errors – the pathing for the Makefile doesn’t expect the example to be located in your workspace, so a few files have to change to accommodate this.
Open the Makefile (which is now in your workspace, in the imported project), and notice the following line:
MAKEFILE_PATH = ../../../../../sam0/utils/make/Makefile.sam.in
We will need to change this to point to where the “xdk-asf-3.19.0” directory is located. An easy solution (probably not best practices for project structure, but it will work) is to copy the xdk-asf-3.19.0 directory into the project directory, and make the following change in the Makefile:
#in the makefile, comment this out
###MAKEFILE_PATH = ../../../../../sam0/utils/make/Makefile.sam.in
#replace with the following line
MAKEFILE_PATH = xdk-asf-3.19.0/sam0/utils/make/Makefile.sam.in
Next, open “config.mk” in the project directory, and find the following section:
Path to top level ASF directory relative to this project directory.
PRJ_PATH = ../../../../..
Change this section to the correct path, as here:
#Path to top level ASF directory relative to this project directory.
#Note that since we moved the ASF directory into the project directory,
#just type in the name of the ASF directory.
PRJ_PATH = xdk-asf-3.19.0/
Next, right click on the project, and go to properties. From the C/C++ Build section, under “Builder Settings”, uncheck “Use Default Build Command”, and type “make -f Makefile” instead, as in the following image:
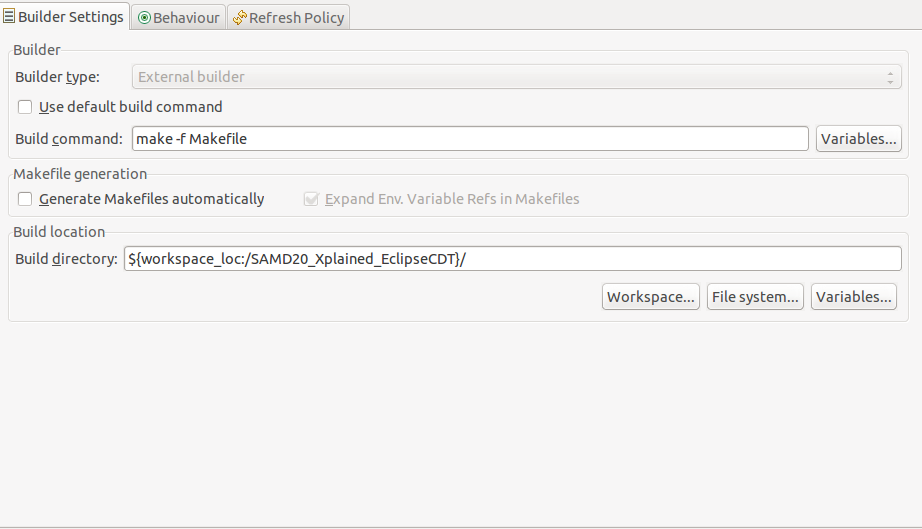
Now, apply the change, refresh the project, and attempt to build. With any luck, you’ll end up with a successful build, producing .elf and .hex files that can then be used to program the board.
Installing Program to SAMD20 Xplained Pro
We’ll use gdb for this step, so run the following:
sudo apt-get install gdb
Open a terminal, get OpenOCD up and running as in the previous step, and connect to the board. Ensure that the below line appears:
info : at91samd20j18.cpu: hardware has 4 breakpoints, 2 watchpoints
Next, open another terminal, and navigate to the Eclipse workspace where your project resides. Navigate to where the generated files are (look for the .bin and .elf files) and type the following in the terminal (from Andrey Yurovsky’s G+ post):
arm-none-eabi-gdb -ex "target remote localhost:3333" -ex "mon reset halt" low_power_flash.elf
This will cause some additional lines of output to appear in your OpenOCD window; this is expected. See the below:
Next, in gdb, type the following:
load
mon reset init
c
Now, pressing the SW0 button (not the reset button) on the SAMD20 Xplained Pro dev board will light LED0.
Next Steps
To experiment, look at the “config.mk” file, and see where the source files are being pulled from – to build your own files, just modify these entires in config.mk, and have at it.